



Acțiuni grupate
Modificați mai mulți utilizatori într-o singură operațiune: mesaj, editare rapidă, credite, carduri, suspendare, coș de gunoi. Un filtru bine gândit transformă o seară de introducere a datelor într-un singur clic.
Selectarea mai multor utilizatori
- În Administrare›Utilizatori›Gestionarea utilizatorilor, rafinați lista cu Filtre: abonament, profil, grup, categorie de vârstă, stare și multe alte criterii care se pot combina.
- Bifați utilizatorii unul câte unul sau faceți clic pe Selectează tot pentru a lua tot rezultatul filtrului. Deselectează tot anulează selecția dintr-o singură dată.
- Deschideți meniul Acțiuni.
Aceste trei comenzi se află în aceeași bară, împreună cu contorul de selecție. Pe un calculator, bara se găsește în dreapta câmpului „Căutare”; pe un mobil, imediat dedesubt.

Aplicarea unei acțiuni grupate
Meniul Acțiuni propune, în funcție de drepturile dumneavoastră:
- Editare rapidă: modificați dintr-o singură dată profilul, abonamentul și datele acestuia, starea de plătit sau neplătit, grupurile, notificările, prezența în anuar, certificatul medical, confidențialitatea, sau resetați parolele.
- Trimite un mesaj: redactați un mesaj către utilizatorii selectați.
- Credite: ajustați contoarele de credite în masă.
- Imprimați carduri: generați carduri personalizate în format PDF.
- Șterge: mutați utilizatorii în coșul de gunoi.
- Suspendă și Reactivați: blocați sau redeschideți accesul, cu motiv și notificare opționale.
- Steag: adăugați sau eliminați un marcaj vizual pentru a identifica fișele de tratat.

Pentru campaniile de e-mail cu câmpuri de fuziune și urmărirea livrabilității, preferați modulul dedicat:
Ajustarea creditelor în masă
Acțiunea Credite tratează separat Credite de rezervare și Credite de invitație: fiecare familie are propria opțiune și puteți lăsa una pe Nu face nimic în timp ce modificați cealaltă.
Sunt disponibile patru operațiuni:
- Adaugă / retrage credite: fiecare contor evoluează pornind de la soldul său actual.
- Actualizarea contoarelor: impune același sold tuturor utilizatorilor selectați.
- Înmulțire / Împărțire: convertește soldurile existente, de exemplu la o schimbare de tarif.
- Convertiți în credite de invitație (sau Convertiți în credite de rezervare): transferă un sold de la o familie la cealaltă.

O notă opțională însoțește fiecare operațiune: apare în istoricul fișei și vă va scuti de a reconstitui mai târziu motivul unei ajustări.
Imprimarea cardurilor personalizate
Acțiunea Imprimați carduri generează un PDF de înaltă definiție în format carte de vizită, 85 × 55 mm.

- Alegeți un Temă în culorile organizației.
- Sub Date de afișat, bifați ce trebuie să apară pe card: identificatorul și adresa de conectare, data nașterii, numărul de licență, clasamentul, numele și datele abonamentului, codul de acces.
- Sub Opțiuni, adăugați fotografia, pastilele colorate de abonament și de profil, sau adresa propriului site.
- Alegeți Repere și margini pierdute în funcție de modul de imprimare, apoi faceți clic pe Generați cardurile.
Pentru o imprimare de birou, păstrați Niciunul. Pentru o tipografie profesionistă, alegeți Margini pierdute sau Margini pierdute + linii de tăiere: marginile și marcajele de tăiere evită marginile albe.
Curățarea utilizatorilor inactivi
O bază de utilizatori se îngreunează de la an la an: foști membri, înregistrări fără continuare, conturi create pentru un stagiu de pregătire. Două filtre bine alese îi izolează pe cei care nu mai folosesc nimic, iar acțiunea grupată îi trimite în coșul de gunoi.
Avantajul nu este doar confortul citirii: utilizatorii mutați în coșul de gunoi nu mai sunt luați în calcul la limita abonamentului dumneavoastră. Curățarea eliberează, așadar, locuri, fără a schimba planul. Și nimic nu se pierde — coșul de gunoi păstrează fișele și istoricul lor.
Deschiderea panoului de filtre
- Accesați Administrare›Utilizatori›Gestionarea utilizatorilor.
- Faceți clic pe Filtre, deasupra listei. Un panou se deschide pe jumătatea din dreapta a ecranului, cu toate criteriile disponibile.
- În cuprinsul panoului, deschideți secțiunea Activitate.
Contorul rezultat(e), din partea de sus a panoului, se actualizează la fiecare criteriu ales. Resetează, chiar alături, elimină toate filtrele pentru a porni de la zero.
Excluderea utilizatorilor înregistrați recent
În criteriul Data adăugării, alegeți Acum mai mult de, apoi durata: 3, 6 sau 12 luni.
Acest filtru se aplică primul, înaintea celui de inactivitate. Fără el, selecția dumneavoastră ar conține înregistrările din ultimele săptămâni: o persoană înregistrată acum zece zile nu a rezervat și nici nu a deschis aplicația, deci este tehnic inactivă, iar dumneavoastră ați șterge-o înainte chiar de prima ei vizită.
Selectarea utilizatorilor inactivi
În criteriul Activitate, alegeți Inactivi, apoi durata, de la 3 la 36 de luni: de mai mult de 12 luni, de exemplu.
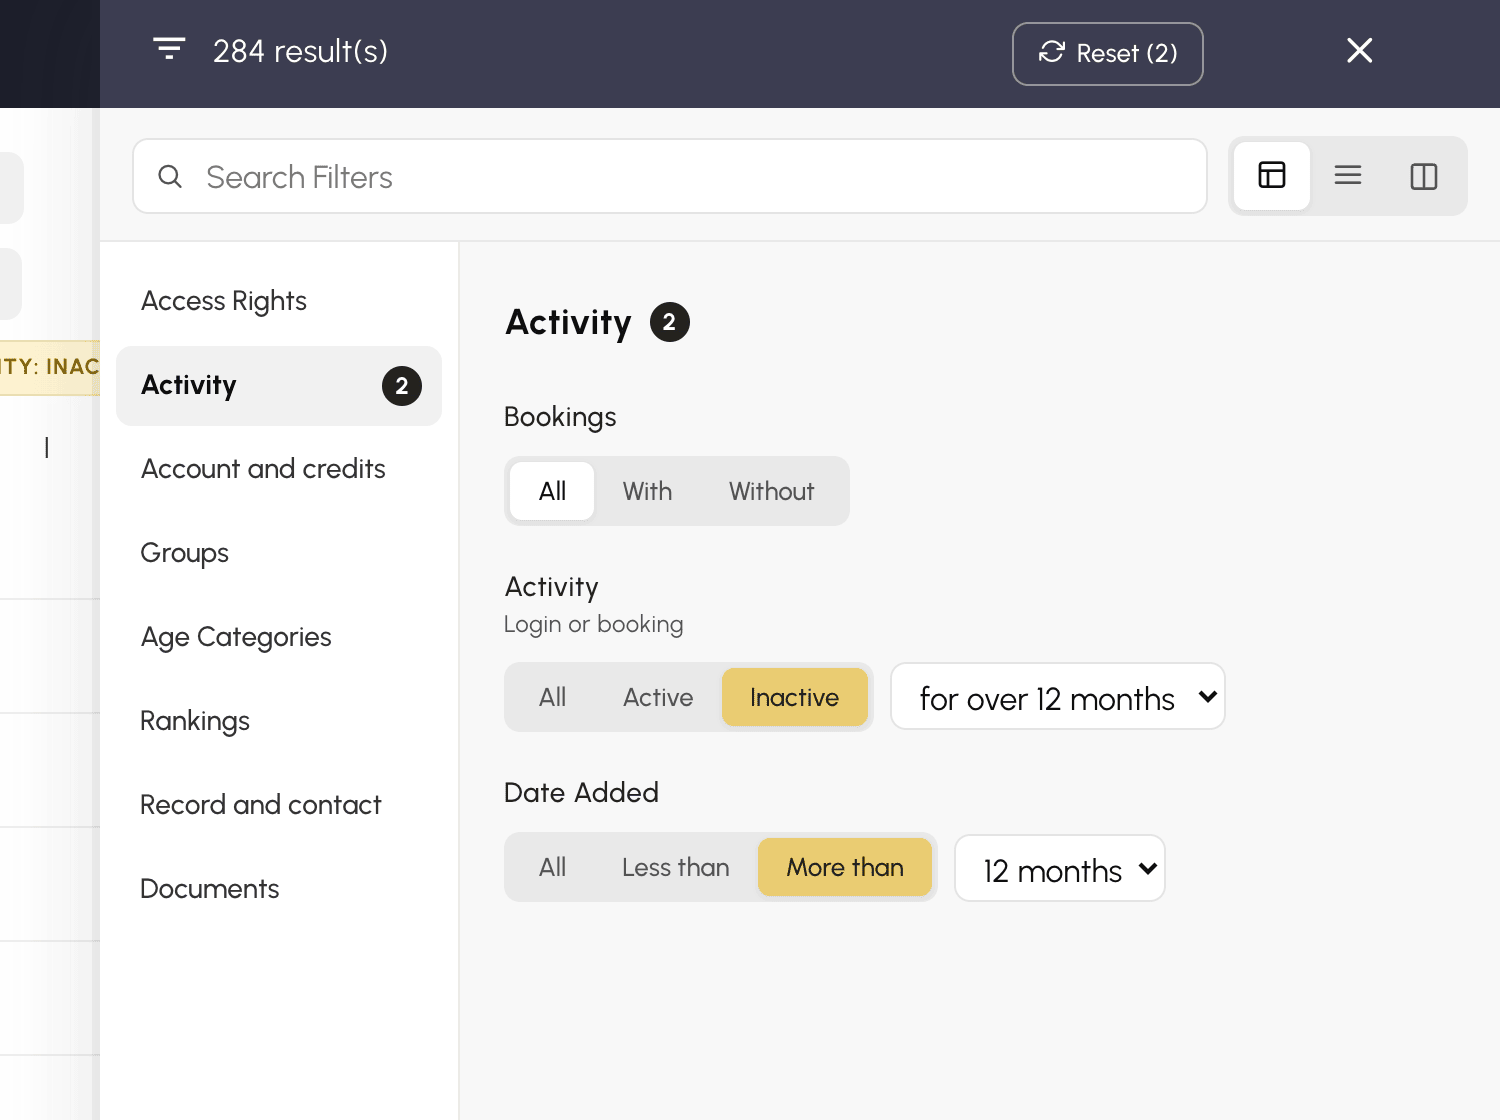
Acest filtru nu se uită doar la conectări: verifică și rezervările. Un membru care nu se conectează niciodată, dar pe care partenerii săi îl înscriu pe intervalele lor orare, nu va fi considerat inactiv, și este bine așa: el joacă.
Variați durata pentru a evalua. Douăsprezece luni se potrivesc unei organizații cu sezon anual, douăzeci și patru unei structuri în care oamenii revin intermitent. Contorul rezultat(e) arată imediat câte fișe sunt vizate.
Adăugarea altor filtre
Cele două criterii precedente nu fac distincție între categoriile de persoane. Or, nu se face aceeași curățenie peste tot: adăugați câte criterii sunt necesare, toate se combină.
- În secțiunea Drepturi de acces, restrângeți la un profil: vizitatorii și conturile create pentru o probă se exclud fără ezitare, personalul de încadrare și membrii aleși niciodată.
- În aceeași secțiune, vizați un abonament anume, de exemplu un card cu plata la oră sau un abonament de închiriere care nu a fost reînnoit.
- Celelalte secțiuni se încrucișează în același fel: categorie de vârstă, grup, clasament, suspendare.
Bifați mai multe elemente din aceeași listă pentru a le aduna: două profiluri bifate rețin persoanele dintr-unul sau din celălalt. În schimb, listele diferite se cumulează: un profil și un abonament bifate împreună păstrează doar persoanele care îndeplinesc ambele condiții.
Pentru a exclude o categorie în loc să o vizați, comutați lista pe Exclude: un profil Personal de încadrare bifat în modul Exclude scoate personalul de încadrare din rezultat, indiferent de nivelul său de activitate.
Verificare, apoi ștergere
- Închideți panoul și parcurgeți lista obținută. Ea conține uneori cazuri pe care niciun filtru nu le poate cunoaște — trezorierul care nu rezervă niciodată, contul administrativ al unui profesor, contactul unei colectivități partenere.
- Bifați fișele de șters una câte una. Dacă lista este potrivită așa cum este, Selectează tot preia întregul rezultat al filtrului, urmând să debifați apoi excepțiile.
- Deschideți Acțiuni, apoi Șterge.
Fișele ajung în coșul de gunoi, dispar din listele dumneavoastră și nu mai sunt luate în calcul la abonament.
