



Casă de marcat
Vindeți la tejghea fără a mai trece prin crearea unei comenzi: alcătuiți coșul clientului cu ajutorul unor plăci tactile, apoi încasați plata. Accesați meniul Administrare›Panou de control›Facturare›Casă de marcat.
Când să folosiți casa de marcat
Casa de marcat nu este rezervată plăților imediate: este pur și simplu o altă modalitate de a crea o vânzare, mai directă decât formularul de comandă. Alcătuiți un coș din câteva atingeri, iar statusul pe care îl dați plății decide ce devine vânzarea.
- Plată Confirmat: vânzarea este achitată pe loc și devine factură. Este cazul tejghelei — un tub de mingi, o băutură, un carnet de credite.
- Plată În așteptare: deocamdată nu se încasează nimic, vânzarea rămâne în așteptarea plății. Tocmai ați creat un bon de comandă, pe care clientul îl va achita mai târziu prin transfer bancar sau la următoarea vizită.
Mulți administratori găsesc casa de marcat mai intuitivă decât meniul vânzărilor pentru a crea o comandă, chiar și fără să încaseze: produsele sunt la vedere, sub formă de plăci, nu într-un formular.
Aceasta este modalitatea corectă de a privi cele două ecrane: casa de marcat merge repede și acoperă esențialul, urmărirea vânzărilor oferă toate reglajele. Nimic nu vă împiedică să începeți cu una și să terminați cu cealaltă.
Alcătuirea coșului
Catalogul se afișează sub formă de plăci. Fiecare clic adaugă articolul în Coș, iar al doilea mărește cantitatea.

Mai multe file vă ajută să găsiți rapid un articol: Toți, Favorite, Populare — cele mai vândute — și Diverse, completate de categoriile catalogului dumneavoastră. Câmpul Căutare rămâne cel mai rapid de îndată ce catalogul se mărește.
Plăcile afișează Stoc rămas atunci când produsul gestionează unul, precum și mențiunea Eșec atunci când este epuizat.
Vânzarea a ceea ce nu se află în catalog
Butonul Personalizat creează o linie pe loc: un Etichetă blocantă, un Suma totală cu TVA inclus și o cotă de TVA. Dacă articolul revine în mod regulat, creați-l mai bine o dată pentru totdeauna în catalog: scurtătura Gestionați produsele duce direct acolo, iar astfel câștigați și urmărirea vânzărilor pe produs.
Atribuirea vânzării unei persoane
În mod implicit, vânzarea este înregistrată pe numele Vizitator ocazional. Este alegerea potrivită pentru un vizitator care cumpără o băutură.

Atribuiți-o unui utilizator de îndată ce natura achiziției o cere, iar acest lucru este indispensabil în două cazuri:
- o vânzare de credite, care trebuie să alimenteze un cont precis pentru a putea fi folosită;
- un abonament, care are sens doar atribuit unei persoane — butonul Alegeți un plan selectează atunci planul dorit.
Butonul Detașați revine la clientul ocazional dacă ați greșit persoana.
Completarea datelor unui client ocazional
În momentul încasării, puteți introduce identitatea și adresa clientului fără să îi creați un cont: nume, prenume, adresă, precum și blocul Adresă companie cu Denumire companie, Identificatorul organizației și codul de TVA pentru o vânzare către o firmă.
Aceste date sunt fixate pe vânzare. Ele servesc la emiterea unei facturi nominale și fac vânzarea ușor de regăsit: căutarea din urmărirea comenzilor interoghează aceste câmpuri, fără de care toate vânzările la tejghea ar semăna între ele.
Aplicarea unei reduceri
Două posibilități, direct în coș:
- Cod promoțional, care aplică o operațiune comercială deja definită;
- Reducere manuală, în Procentaj sau în Suma, decisă de la caz la caz.
Totalul ține cont imediat de reducere, dar rețineți mențiunea „reducere estimată, revalidată la încasare”: un cod expirat sau al cărui plafon de utilizări a fost atins va fi înlăturat în momentul validării, iar suma reală vă va fi prezentată înainte de a confirma.

Încasarea plății
- Faceți clic pe Încasează: coșul se blochează, iar fereastra de plată se deschide cu suma de încasat.
- Alegeți modalitatea de plată: CB la fața locului, Numerar, Transfer sau Cec.
- Alegeți statusul plății: Confirmat dacă banii sunt încasați (factură), În așteptare dacă plata va veni mai târziu (comandă).
- Confirmați: comanda este creată, plata este înregistrată, iar coșul se golește pentru clientul următor. Comanda se deschide apoi într-un panou lateral, gata de completat dacă este nevoie.
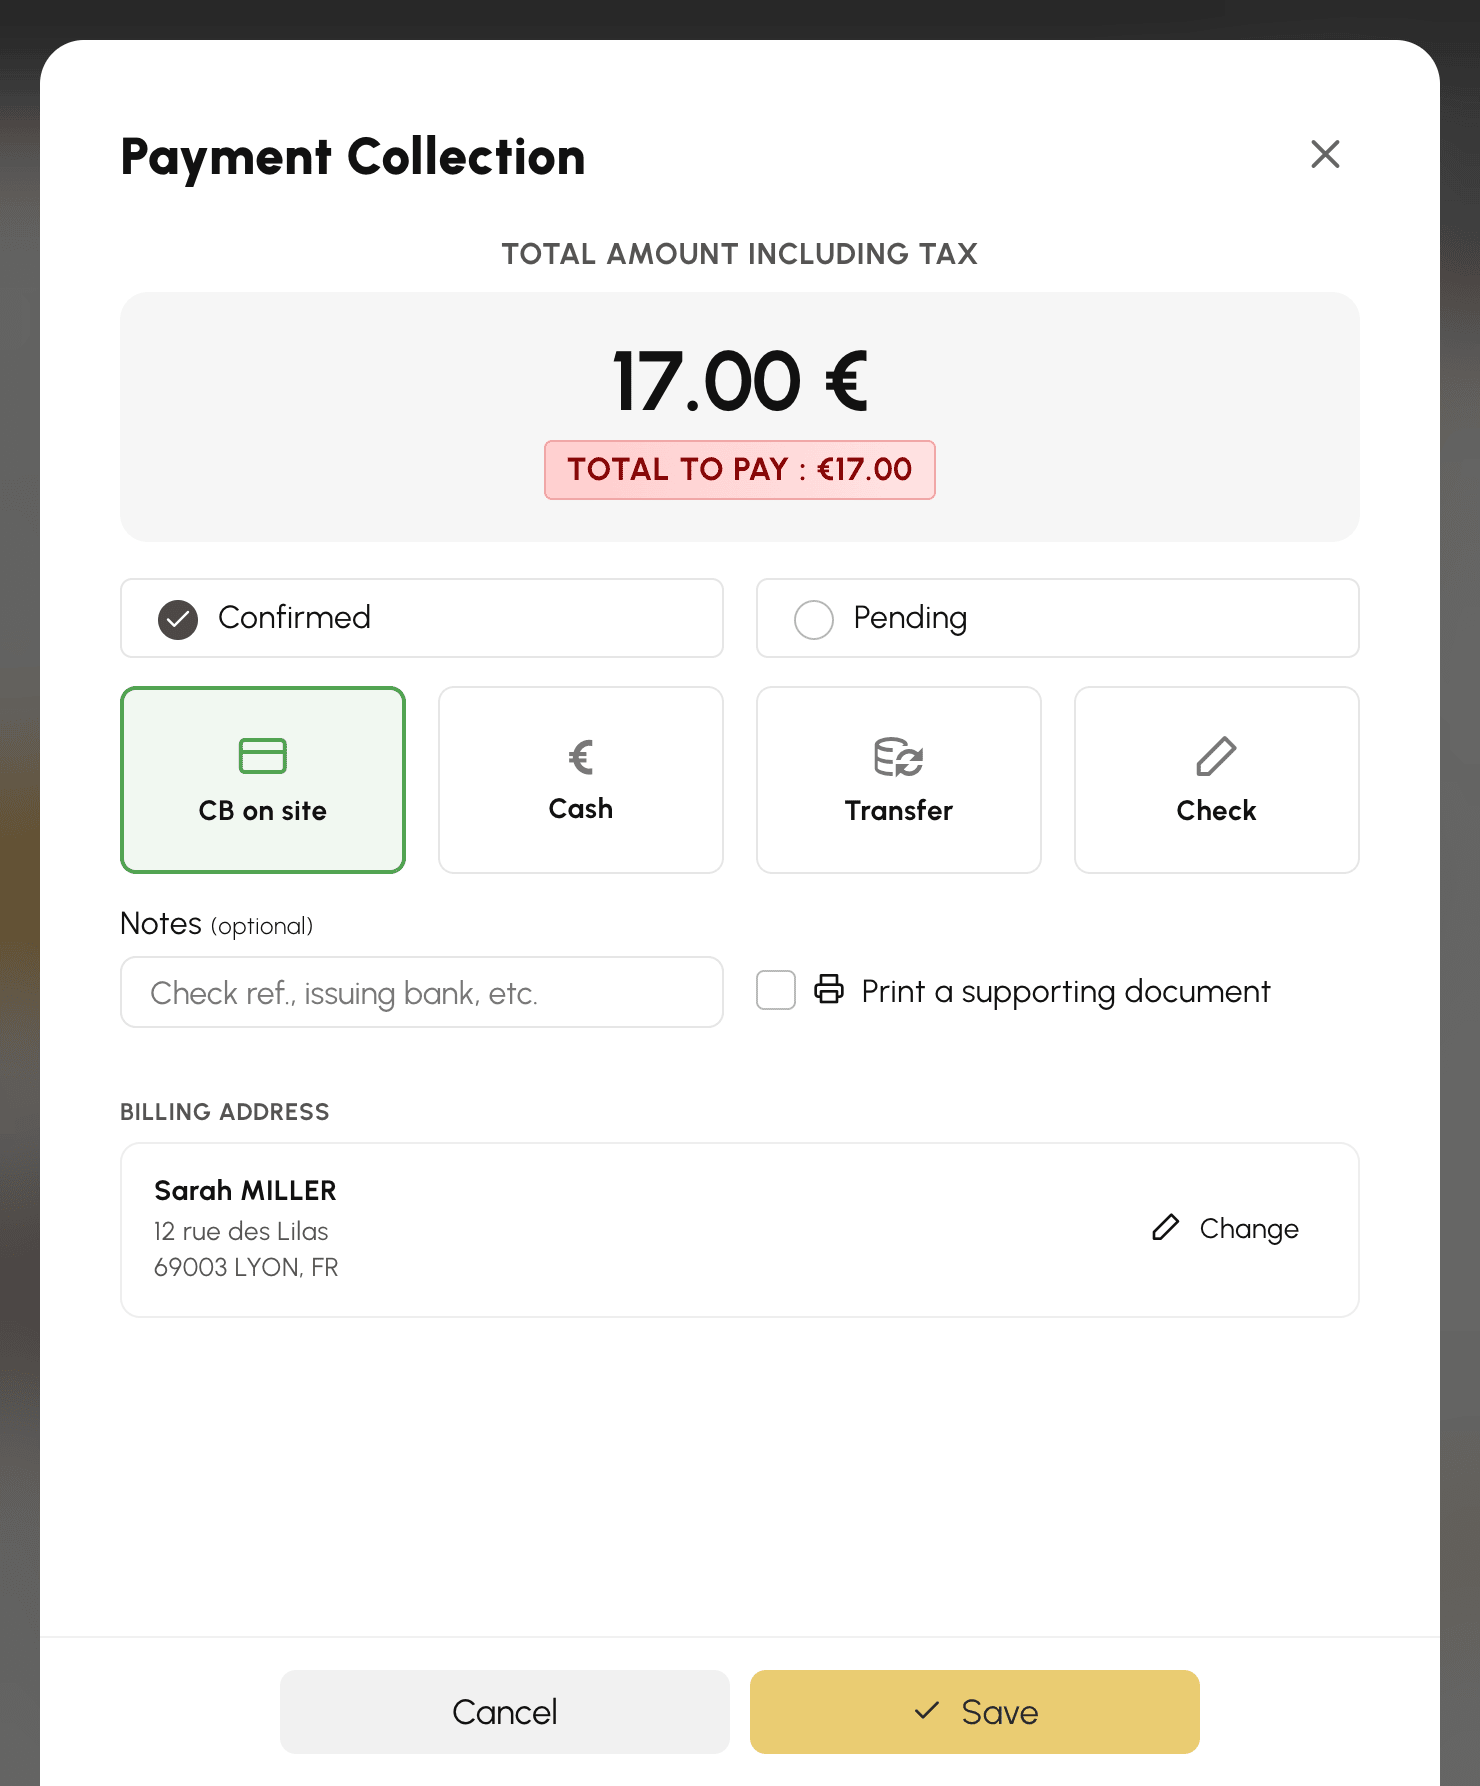
Alegerea adresei de facturare a clientului
Când vânzarea este atribuită unui utilizator, fereastra de încasare afișează Adresa de facturare al acestuia, cea implicită la început. Butonul Schimbați desfășoară lista adreselor sale chiar în fereastră: faceți clic pe adresa dorită sau creați una cu Adresă nouă. Puteți de asemenea corecta sau șterge o adresă, la fel cum ar face utilizatorul din contul său.
Modalitatea de plată și notele deja introduse se păstrează. Cât timp formularul unei adrese este deschis, butoanele sale Înapoi și Salvează iau locul celor de plată: ele salvează adresa, niciodată vânzarea.
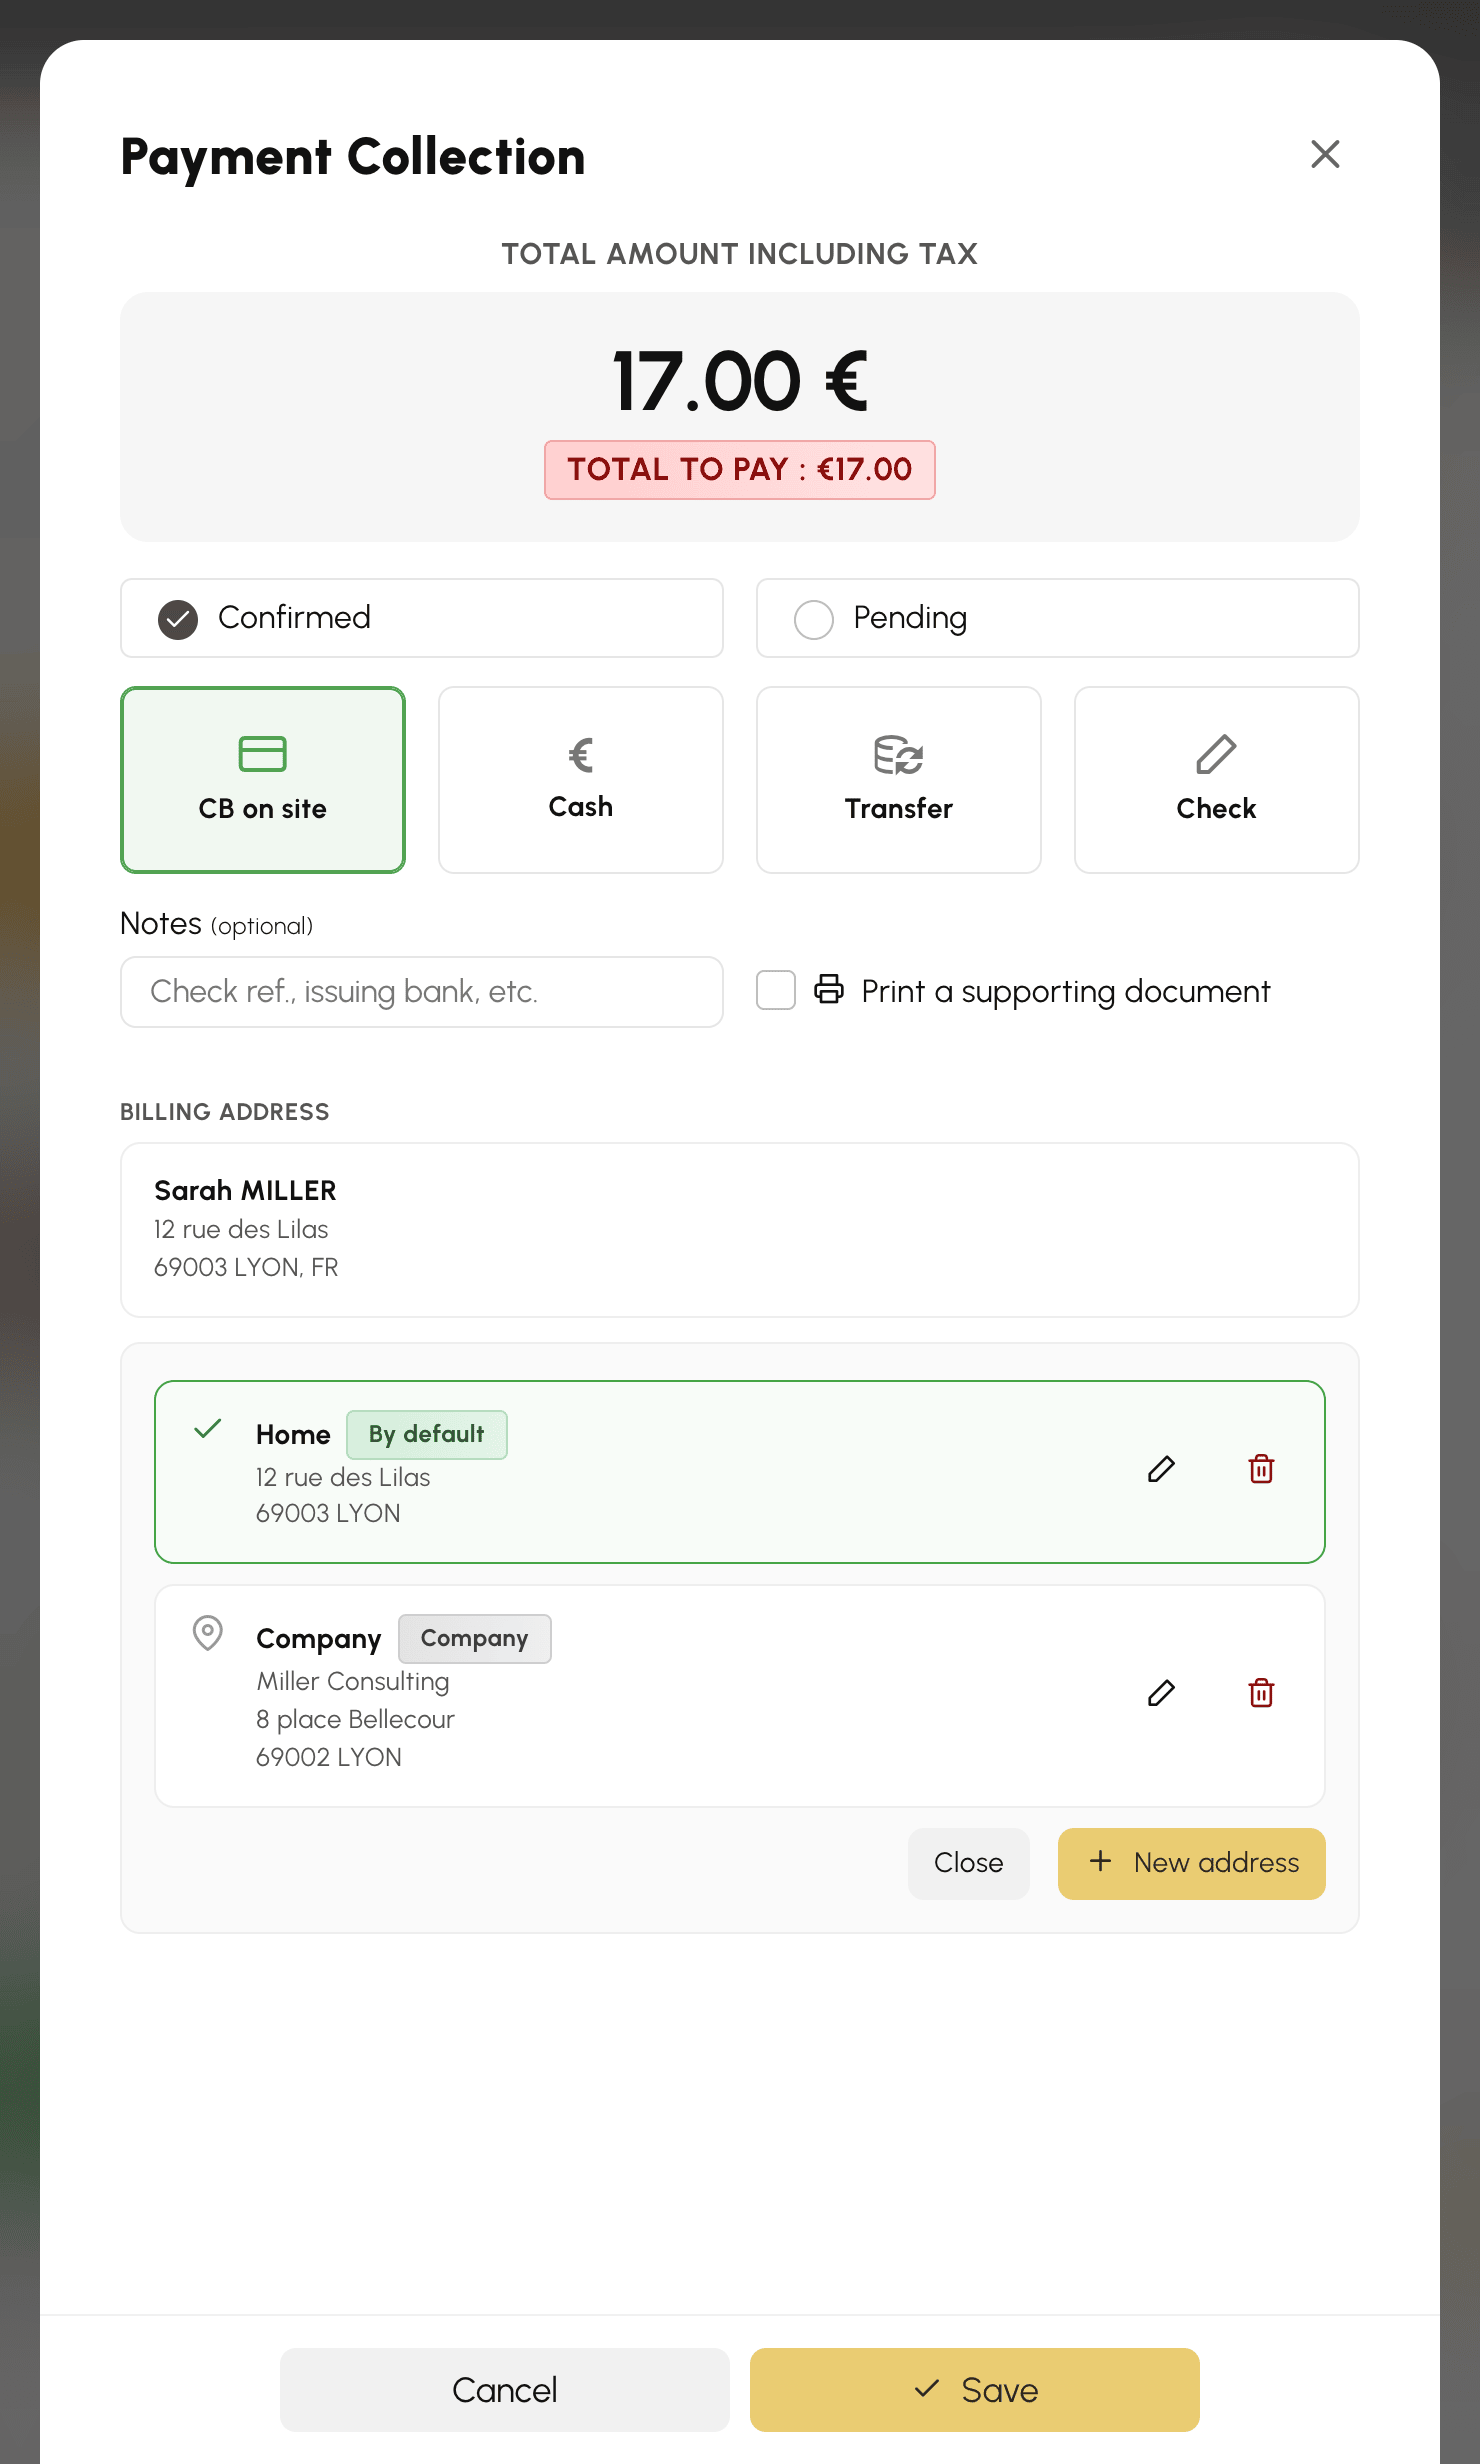
Adresele create sau modificate ajung imediat în contul utilizatorului. Adresa aleasă, în schimb, se aplică vânzării doar în momentul în care o confirmați.
Încasarea pe terminalul de plată
Dacă un terminal de plată este asociat contului dumneavoastră de facturare, alegerea CB la fața locului face să apară linia Terminale, cu terminalul dumneavoastră deja selectat: în cazul obișnuit, nu aveți nimic altceva de făcut decât să confirmați. Pictograma Introducere manuală rămâne disponibilă pentru a înregistra o plată cu cardul încasată altfel.
De îndată ce un terminal este selectat, statusul se blochează pe Confirmat și data se fixează — terminalul este cel care va confirma plata, nu dumneavoastră. Butonul devine Continuare: el trimite suma către aparat, unde clientul prezintă cardul.

În timpul încasării, coșul rămâne blocat: ceea ce încasați este exact ceea ce a văzut clientul.
Regăsirea unei vânzări la tejghea
Vânzările de la casa de marcat ajung în urmărirea comenzilor ca toate celelalte. Căutați-le după numele clientului, dacă a fost completat, sau după perioadă, dacă vânzarea este anonimă. Rambursarea, trimiterea facturii prin e-mail și exporturile contabile funcționează identic.
